How to Create Email Signature in Office 365 Outlook


While corresponding with individuals via traditional mail you generally incorporate a signature, don’t you? Absolutely yes, because adding an email signature in Office 365 to each email is an opportunity to promote your business. With the help of Office 365 email signatures, you can look more professional and can demonstrate your organization’s identity. To your client, you would never send a scrap of empty paper with your contact information scripted on it, would you? No way! Thus, Office 365 centralised email signatures are an extremely valuable tool for every user and also very simple to implement. However, there are many users who do not know that how to create email signature in Office 365 Outlook. Consequently, to resolve their difficulty, we have come up with this write-up. Yet, before going to the solution section, it is essential to know about Offic 365 Email Signature. So let us start!
What is Email Signature in Office 365?
The Office 365 email signature is a text series that is embedded at the end of email correspondence. This can be added manually or automatically to make the email messages more professional. Email signatures include the sender’s contact information like name, email, the address of the organization, contact number, fax etc.
Note: Transfer data from Microsoft Outlook (Desktop) to O365 Cloud using Office 365 PST Import Tool and access your data on Cloud.
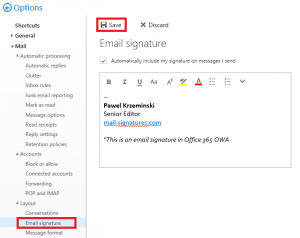
How to Set Up Email Signature in Office 365 Step by Step
Users can automatically attach text, HTML or image signature in the email sent from their Office 365 account. Here are the guidelines to create email signature in Office 365:
- First, Log in to your Office 365 account and click on App Launcher icon
- Here, select Admin >> Admin Centers >> Exchange
- From the EAC, go to mail flow and click on Add icon (+) >> Create a New Rule
- In New Rule page, enter the Name of Rule and select Apply to All Messages option from Apply this rule if.. section
- Choose to Append the disclaimer option from Do the following.. menu to resolve ‘how to create auto signatures centrally in Office 365 Exchange Online’ query
- Now, click on Enter Text Link and select Wrap option from the Select One link
- The specify disclaimer text window will appear now. The disclaimer text supports HTML tags so, click on OK >> Save
- To verify the done procedure, you can send a test mail to any other email address without adding signature manually
- Check the test mail that you sent from your Office 365 account and you will get that the email signature has been automatically integrated with the email
Limitations of Manual Solution
The inbuilt Office 365 centralised email signature feature comprise some limits. There are many tasks that we cannot achieve with the help of this solution, such as:
- Analyzing the Office 365 email signature directly under the latest message reply or forward.
- Demonstrating server-side email signatures in the users’ Sent Items folders.
- Adding images to email signatures is impossible.
- Skip the lines that include variables that could not be updated (It is so because the value was not provided for the user).
The Final Verdict
In this technological era, everybody wants to show themselves professional and it is important too. Because this is the only way to enhance their business growth. Adding signatures in Office 365 to email messages is among such things that extremely help users to become more professional and it also represents the repudiation of the sender’s organization or their personal status. In order to help users, this editorial comprises a total solution of how to create an email signature in Office 365. Following the guidelines sequentially, users will get accurate results without any difficulty.
Must Read: Export Exchange Global Address List to CSV